Getting Started
Layouts
Gradle
RecyclerView onClickListeners
NavigationView
Intent
JSON handling with org.json
Android Studio
Resources
Data Binding Library
Exceptions
Getting Calculated View Dimensions
AsyncTask
SharedPreferences
Emulator
Material Design
Lint Warnings
Service
Storing Files in Internal and External Storage
WebView
Project SDK versions
RecyclerView
Google Maps
PorterDuff Mode
9-Patch images
Android NDK
RecyclerView Decorations
Camera 2 API
ViewPager
CardView
HttpURLConnection
SQLite
ADB Android Debug Bridge
ButterKnife
Supporting different screen resolutions
Glide
Retrofit2
Dialog
ACRA
GreenDAO
Formatting Strings
Notifications
AlarmManager
Fragments
Handler
Creating Custom Views
BroadcastReceiver
Activity
Snackbar
Runtime Permissions in API-23
Logging and using Logcat
VectorDrawable and AnimatedVectorDrawable
Tools Attributes
Toast
Interfaces
Animators
Location
Theme Style Attribute
The Manifest File
Parcelable
MediaPlayer
Multidex and the Dex Method Limit
Data Synchronization with Sync Adapter
Menu
Instant Run in Android Studio
Picasso
Bluetooth LE API
RoboGuice
Memory Leaks
Universal Image Loader
Volley
Widgets
Date and Time Pickers
Integrate Google Sign In
In-app billing
FloatingActionButton
ContentProvider
Dagger 2
Realm
Unit testing in Android with JUnit
Android Versions
Wi-Fi Connections
SensorManager
Localization with resources
ProgressBar
Custom Fonts
Vibration
Google Awarness APIs
Text to Speech (TTS)
UI Lifecycle
Spinner
Data Encryption / Decryption
Testing UI with Espresso
Writing UI tests
GreenRobot EventBus
OkHttp
Enhancing Performance Using Icon Fonts
Handling Depp Links
Canvas drawing using SurfaceView
Firebase
Crash Reporting Tools
Check Internet Connectivity
Facebook SDK
Unzip File
Android Places API
Creating your own libraries
Handling JSON with Gson
Device Display Metrics
TextView
ListView
Building Backwards Compatible Apps
Loader
ProGuard - Obfuscating and Shrinking your code
Detect Shake Event
Typedef Annotations
Capturing Screenshots
MVP Architecture
Orientation Changes
Xposed
Security
PackageManager
ImageView
Gesture Detection
Doze Mode
Android Sound and Media
SearchView
Camera and Gallery
Callback URL
Twitter APIs
SqlCipher integration
Drawables
Colors
ConstraintLayout
RenderScript
Fresco
Swipe to Refresh
AutoCompleteTextView
Installing apps with ADB
IntentService
AdMob
Implicit Intents
Publish to Play Store
Firebase Realtime Database
Image Compression
Email Validation
Keyboard
Button
TextInputLayout
Bottom Sheets
CoordinatorLayout and Behaviors
EditText
Paypal Gateway Integration
Firebase App Indexing
Firebase Crash Reporting
Displaying Google Ads
Vk SDK
Localized DateTime
Count Down Timer
Reading Barcode and QR codes
Otto Event Bus
TransitionDrawable
Port Mapping using Cling
Creating Overlay always-on-top Windows
ExoPlayer
Inter-app UI testing with UIAutomator
MediaSession
Speech to Text Conversion
FileProvider
Publish .aar file to Apache Archive with Gradle
XMPP
Authenticator
RecyclerView and LayoutManagers
AudioManager
Job Scheduling
Accounts and AccountManager
OpenCV
Split Screen Multi-Screen Activities
Threads
MediaStore
Time Utils
Touch Events
Fingerprint API
MVVM Architecture
BottomNavigationView
ORMLite
YouTube API
TabLayout
Retrofit2 with RxJava
DayNight Theme AppCompat
ShortcutManager
LruCache
Using Jenkins CI
Zip files
Vector Drawables
Fastlane
Define step value for RangeSeekBar
Getting started with OpenGL ES 2.0
Check Data Connection
Java Native Interface (JNI)
FileIO
Perfomance Optimization
Robolectric
Moshi
Strick Mode Policy
Internalization and localization
Retrolambda
SparseArray
Firebase Cloud Messaging
Shared Element Transitions
Android Things
VideoView
ViewFlipper
Dependency Injection with Dagger 2
Formatting phone numbers
Storing password securely
Android Kernel Optimization
Paint
AudioTrack
ProGuard
Create Android Custom ROMs
Java on Android
Pagination in RecyclerVi
Genymotion for Android
Handling touch and motion events
Creating Splash screen
ConstraintSet
CleverTap
Publish library to Maven repositories
ADB shell
Ping ICMP
AIDL
Using Kotlin
Autosizing TextView
Signing apps for release
Context
Activity Recognition
Secure SharedPreferences
Bitmap Cache
Android x86 in VirtualBox
JCodec
Design Patterns
Okio
Google SignIn integration
TensorFlow
Game developmen
Notification Channel
Bluetooth Low Energy (LE)
Leak Canary
FuseView
SQLite using ContentValues
Enhancing Alert Dialogs
Hardware Button Events, Intents PTT
SpannableString
Looper
Optimized VideoView
Google Drive API
Animated AlertDialog Box
Annotation Processor
SyncAdapter with periodically do sync of data
Singleton Class for Toast Message
Fastjson
Android Architecture Components
Jackson
Play Store
Loading Bitmaps Effectively
Getting system font names
Smartcard
Convert vietnamese string to english
Contributors

Patches

suggest change

9 Patches are stretchable images in which the areas which can be stretched are defined by black markers on a transparent border.

There is a great tutorial here.

Despite being so old, it’s still so valuable and it helped many of us to deeply understand the 9 patch gear.

Unfortunately, recently that page has been put down for a while (it’s currently up again).

Hence, the need to have a physical copy of that page for android developers on our reliable server/s.

Here it is.

A SIMPLE GUIDE TO 9-PATCH FOR ANDROID UI May 18, 2011

While I was working on my first Android app, I found 9-patch (aka 9.png) to be confusing and poorly documented. After a little while, I finally picked up on how it works and decided to throw together something to help others figure it out.

Basically, 9-patch uses png transparency to do an advanced form of 9-slice or scale9. The guides are straight, 1-pixel black lines drawn on the edge of your image that define the scaling and fill of your image. By naming your image file name.9.png, Android will recognize the 9.png format and use the black guides to scale and fill your bitmaps.

Here’s a basic guide map:
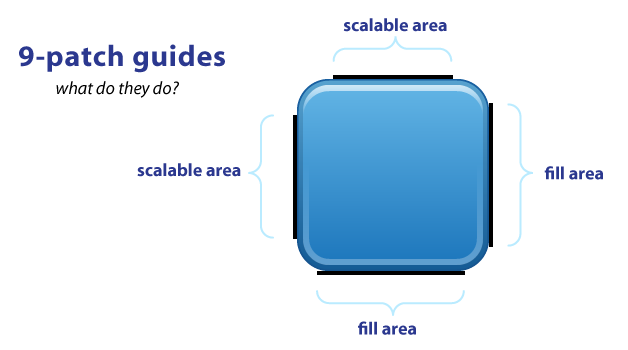
As you can see, you have guides on each side of your image. The TOP and LEFT guides are for scaling your image (i.e. 9-slice), while the RIGHT and BOTTOM guides define the fill area.

The black guide lines are cut-off/removed from your image – they won’t show in the app. Guides must only be one pixel wide, so if you want a 48×48 button, your png will actually be 50×50. Anything thicker than one pixel will remain part of your image. (My examples have 4-pixel wide guides for better visibility. They should really be only 1-pixel).

Your guides must be solid black (#000000). Even a slight difference in color (#000001) or alpha will cause it to fail and stretch normally. This failure won’t be obvious either*, it fails silently! Yes. Really. Now you know.

Also you should keep in mind that remaining area of the one-pixel outline must be completely transparent. This includes the four corners of the image – those should always be clear. This can be a bigger problem than you realize. For example, if you scale an image in Photoshop it will add anti-aliased pixels which may include almost-invisible pixels which will also cause it to fail*. If you must scale in Photoshop, use the Nearest Neighbor setting in the Resample Image pulldown menu (at the bottom of the Image Size pop-up menu) to keep sharp edges on your guides.

*(updated 1/2012) This is actually a “fix” in the latest dev kit. Previously it would manifest itself as all of your other images and resources suddenly breaking, not the actually broken 9-patch image.
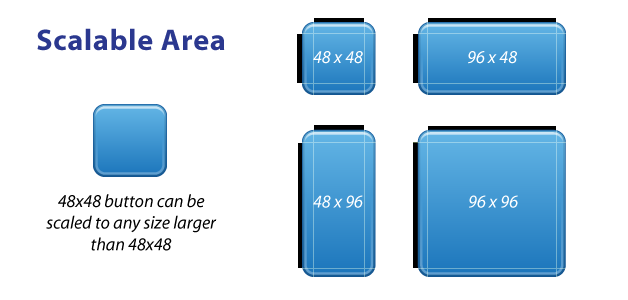
The TOP and LEFT guides are used to define the scalable portion of your image – LEFT for scaling height, TOP for scaling width. Using a button image as an example, this means the button can stretch horizontally and vertically within the black portion and everything else, such as the corners, will remain the same size. The allows you to have buttons that can scale to any size and maintain a uniform look.

It’s important to note that 9-patch images don’t scale down – they only scale up. So it’s best to start as small as possible.

Also, you can leave out portions in the middle of the scale line. So for example, if you have a button with a sharp glossy edge across the middle, you can leave out a few pixels in the middle of the LEFT guide. The center horizontal axis of your image won’t scale, just the parts above and below it, so your sharp gloss won’t get anti-aliased or fuzzy.
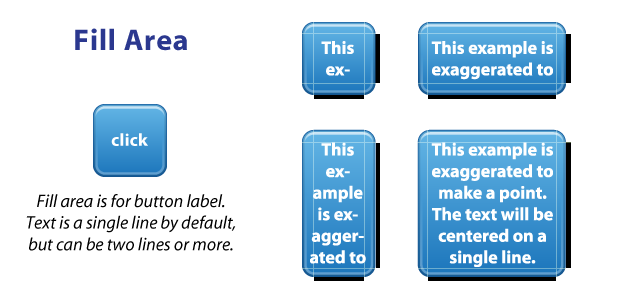
Fill area guides are optional and provide a way define the area for stuff like your text label. Fill determines how much room there is within your image to place text, or an icon, or other things. 9-patch isn’t just for buttons, it works for background images as well.

The above button & label example is exaggerated simply to explain the idea of fill – the label isn’t completely accurate. To be honest, I haven’t experienced how Android does multi-line labels since a button label is usually a single row of text.

Finally, here’s a good demonstration of how scale and fill guides can vary, such as a LinearLayout with a background image & fully rounded sides:
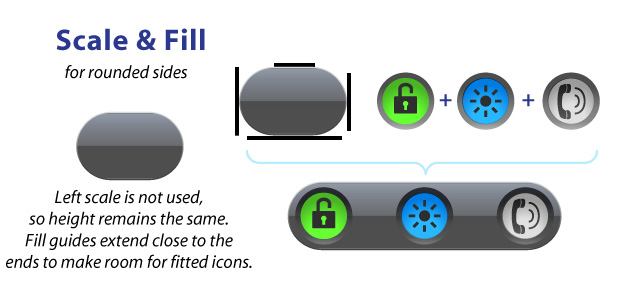
With this example, the LEFT guide isn’t used but we’re still required to have a guide. The background image don’t scale vertically; it just scales horizontally (based on the TOP guide). Looking at the fill guides, the RIGHT and BOTTOM guides extend beyond where they meet the image’s curved edges. This allows me to place my round buttons close to the edges of the background for a tight, fitted look.

So that’s it. 9-patch is super easy, once you get it. It’s not a perfect way to do scaling, but the fill-area and multi-line scale-guides does offer more flexibility than traditional 9-slice and scale9. Give it a try and you’ll figure it out quickly.

Feedback about page:

Feedback:
Optional: your email if you want me to get back to you:


Table Of Contents